Sunday, September 30, 2012

Halloween Picture Frame


Today I have a simple but easy Halloween project for you.
 A Halloween picture frame using retired designer series paper "Pick Your Poison" from the Clearance Rack you can get here


 I used a frame from one of the craft stores and covered it with a sheet of Pick Your Poison designer series paper using Multipurpose Liquid glue. Using the same package of designer series paper, I cut out the bat and added blood dripping from his mouth using Real Red Stampin' Right Marker. Before putting the bat picture in the frame I cut a piece of Window Sheet from the big catalog to cover the bat picture. You can't see it here but it looks just like a frame you would buy with glass.

I sanded the edges of the designer series paper using a Designer Sanding Block. This helps make the paper look old and worn.
That's it. A very fast project and gives a lot of bang for your buck!

What you will need to make this picture frame

Pick your Poison Designer Series Paper # 124001 $4.39
Sanding Blocks pg. 179 # 124304 $3.50 (2) blocks
Window Sheets pg. 160 #114323 $4.95 (2) 12 x 12" sheets
Real Red Stampin' Write Marker pg. 153 #100052 $3.50
Multipurpose Liquid Glue pg. 177 #110755 $3.95 
 
Non Stampin' Up!
Picture frame from $1 store or craft store

Tomorrow is the first day of October so Halloween will be here before we know it. I will be featuring more Halloween projects this week.
Hope your week end was a good one.
Happy Stampin'
Jane

Thursday, September 27, 2012

Watercolor Winter

I'm back today with another Christmas Card made from the stamp set Watercolor Winter. This set is what we call two-step stampin' because there is a bold image and an outlined image to the stamps. You can see better if you see the card.

  The poinsettia flower, holly and holly leaves are two-step stampin' stamps. I stamped the bold image first. I inked up my stamp and then stamped off on a piece of scrap paper then stamped. Next, I inked up the outline stamp and stamped over the first image. This is a great look and I use it when 
 ever I can. Now if you don't want the two-step look you can just use one stamp, that looks good too.

Products You will need to make this card

Whisper White card stock pg. 156 # 124302
Gumball Green card stock pg.152 # 126838
3/8" Riding Hood Red Taffeta Ribbon pg. 173 #122988
Gumball Green Stampin' Pad pg. 152 # 126861
Real Red Stampin' Pad pg.153 # 126945
Soft Suede Stampin' Pad pg. 156 # 126978
Big Shot Die Cutting Machine pg. 186 # 113439
Labels Collection Framelits pg. 191 # 125598
SNAIL Adhesive pg. 177 # 104332
Stampin' Dimensionals pg. 177 # 104430
Textured Impressions Embossing Folder Lacy Brocade
Holiday Catalog pg. 6 #127819


Tomorrow I'm back to posting Halloween ideas. See you then.
Happy Stampin'!
Jane

Tuesday, September 25, 2012

Ornament Keepsakes Christmas Cards

I'm so excited about the cards I'm showing you today. Not only did I used the Ornament Keepsakes stamp set, I cut the images out using the Big Shot and the Holiday Ornaments Framelites Dies. I bought them together as the Ornament Keepsake Bundle from the Holiday Catalog and saved 15%. You can have them for the same price. This bundle makes card making easy peasy!


I love the look of these cards!  For a change, I wanted a soft look and not the traditional Christmas colors.
These are just three of the 9 stamps that come in the Ornament Keepsakes stamp set.
The beautiful embossed oval was made using our new Textured Impressions Embossing Folder Holiday Frame. I think it's stunning don't you? If you have a lot of Christmas cards to make this year, the Ornament Keepsakes Bundle will make short work of your cards. The look is so elegant, making them is so easy and fun! There are many other combinations you could use. For some of your cards don't use the folder and stamp and cut out the ornaments and adhere them on your card. Again, easy peasy! I have other cards that will show you many other ideas using this bundle.

Products you will need to make these cards...Click here

Whisper White and Pretty In Pink card stock pg.156 # 100730 & pg. 154 #100459
Textured Impressions Embossing Folder Holiday Frame pg. 7 #127820
Ornament Keepsakes Bundle pg. 3 # 129950 (clear mount) 
# 129949 (wood mount)
Rhinestones  Basic Jewels pg. 175 # 119246
Stampin' Dimensionals pg. 177 # 104430
SNAIL Adhesive pg. 177 #104332
Big Shot Machine pg. 186 #113439
 
Non Stampin' Up Product
I used a Sharpie Marker to color the rhinestones pink before adhering them to my card.

In the weeks to come I have all kinds of projects to share with you. Fall, Halloween, Thanksgiving and Christmas. 

Again this year I'm having the 12 days of Christmas with a new project or card each week. I will keep you updated on when this will begin.  It will be earlier enough for you to use my ideas for your holiday planning.

Right now I'm working on a Halloween Birthday Party for October 27th. I will be sharing with you my projects.
I'm working on tree decoration using the Ornament Keepsakes Bundle and the beautiful Scalloped Tulle. I hope you will come back and see what I'm up to.
Happy Stampin'
Jane

Monday, September 24, 2012

Evergreen

Good Morning!
It's a little chilly here today; the temperature is 56 degrees. It  made me stop and think I better get moving on making more Christmas cards. Today my card  is from the Evergreen stamp set from the Holiday Catalog. I really love this set  because of it's simplicity.  I chose to used the Northern Flurry Folder Embosslit as the second layer of my card. It's so easy to run the folder through the Big Shot and you are ready to embellish your card. The base is Gumball Green.


Hopefully you can see more detail in this photo. I used Versa Mark and Heat & Stick Powder on the snowflakes and tree. I used a Blender Pen to apply the VersaMark to the snowflakes and tree. I heat set the powder and then added Dazzling Diamond glitter and heat set again.
I topped the tree off with a Rhinestone Jewel.

Products needed to make this card

Gumball Green card stock pg. 152 # 126836
Whisper White card stock pg. 156 #100730
Northern Flurry Folder pg. 189 120902
Rhinestone Basic Jewels pg. 175 #119246
Gumball Green Stampin' pad pg. 152  # 126861
VersaMark pad pg. 159 # 102283 
Heat & Stick Powder pg. 158 # 100625
Blender Pen pg. 178 # 102845  pg. #113439
Big Shot Die-Cutting Machine pg. 186 #113439

You can shop 24/7 just click here

I hope you will have some time this week to stamp. It's good therapy and it feels so good to make a card or paper project that you can say, "I made that".
Happy Stampin'
Jane

Saturday, September 22, 2012

Today is the First Day of Fall

I mentioned yesterday that I would have a tutorial for you today on how to make the Fancy Favor Box and the pretty Medallion in the middle. I have cleaned off my stamping space and put a new order away and now I can't find my Jumbo Sticky Rounds I used to attach the Tulle for my project.
I'm still looking. I guess I should have left everything where it was...I could find it then...

I do have a Fall card and a Fall Wreath to show you today.


I just love this card. It just screams FALL!
Fall is my favorite season so I'm all rived up  to make Fall cards and 3-D projects!
What you need to make this card
Whisper White, Very Vanilla, Real Red card stock, Early Espresso Core'dinations Card Stock pg. 6
Woodgrain Textured Impressions Embossing Folder pg.33
Autumn Accents Bigz Die pg. 33
Summer Starfruit 3/8" Stitched Satin Ribbon pg. 172
Neutrals Designer Button pg. 176
Whisper White Baker's Twine pg. 172
Stampin' Dimensionals pg. 177 
Orchard Harvest Designer Series Paper pg. 28
Polka Dot Parade Designer Series Paper pg. 164
Word Window Punch pg. 183
Modern Label Punch pg.183
Teeny Tiny Wishes pg. 133
Color Spritzer Tool pg. 179


These aren't the best photos. I had an awful time photographing today. It was raining and almost as dark as night, then the rain stopped and the sun came out and then it was too much light.
This is my first Fall wreath. I just couldn't wait to start using the new Fall products in the Holiday Catalog.
Here is the new Autumn Accents Bigz Die. I added Rhinestones and one large Pearl in the center of the bow that I made out of 3 1/2" Cherry Cobbler Ribbon in the Holiday Catalog.

This photo doesn't due the Cherry Cobbler Ribbon justice. It's so elegant!
This is the Silicone Craft Sheet from the Holiday Catalog. It measures 6" x 6" and works with all Stampi' Up! adhesives and hot glue guns.
You have to have this if you use your heat gun or other adhesives. Drop a dot of adhesive on the sheet and have both hands free to assemble. Let glue dry completely, then pop embellishment off the sheet. It's amazing.

What you need to make this wreath

9" wreath or 9" circle cut out of card board
Glue Gun

Stampin' Up! products 
Orchard Harvest Designer Series Paper pg. 28
Polka Dot Designer Series Paper pg. 164
Early Espresso Core'dinations card stock pg. 6
Gumball Green and Summer Starfruit card stock pg. 152
Cherry Clobber card stock pg. 155
Crumb Cake card stock pg. 156
Autumn Accents Bigz Die pg. 33
Woodgrain Textured Impressions Embossing Folder pg. 33
Cherry Cobbler Scalloped Tulle Ribbon pg. 4
Basic Jewels Rhinestones pg. 175
Basic Large Pearl pg. 175

Shop anytime..24/7 here
 Happy Stampin!
Jane

Friday, September 21, 2012

Fancy Favor Boxes Meet New Tulle Ribbon

I am having so much fun making cards and projects using the new products from the Holiday Catalog. Today I have three Fancy Favor Boxes using the new Scalloped Tulle Ribbon.
The Tulle comes in three colors; Cherry Cobbler, Crumb Cake and Early Espresso. I couldn't make up my mind which one to use so I make a Fancy Favor Box using each color.

 Isn't this pretty? I love the look of the Tulle all the way around
 the Medallion. I used Kraft card stock, Birds of a Feather designer series paper and Crumb Cake Tulle

 This looks like Fall to me. I used Kraft card stock, Howlstooth & Scaringbone designer series paper and Early Espresso Tulle


This one reminds me of Christmas. I used Kraft card stock, Be of Good Cheer designer series paper and Cherry Clobber Tulle

Don't forget to check out the new products we have in the Holiday catalog. Click here 

Come back tomorrow. I will have a FREE tutorial on how to make the Fancy Favor Box using the medallion and Scalloped Tulle
Have a great week-end!
Happy Stampin'
Jane 


Thursday, September 20, 2012

Christmas Tags Using Core'dinations Card Stock

Today I have Christmas Tags using the featuring Core'dinations card stock, Scentsational Season Bundle from the Holiday Catalog.  I bought the bundle because I saved 15% instead of buying them separately.

I really like this bundle because you can make so many different projects. Cards, tags, 3-D projects and you probably can think of more ideas.


Aren't these the cutest? I love the using the Core'dinations card stock. I chose Early Espresso but it comes in Cherry Cobbler and Gumball Green too.
When you sand this card stock you can create an antiqued, distress-color popping look. Outside layers are exclusive Stampin' Up! colors-one side textured and one side smooth. The inside layer is a monochromatic color. This  is revealed when sanded with Stampin' Sanding System.
To get the wood grain look, I used the new Textured Impressions Embossing Folder from the Holiday Catalog. Just run it through the Big Shot, sand with the Sanding System and you will love the look.

I started with 3" x 3" card stock for the tag base. I cut 2 3/4" x 2 3/4" Early Espresso Core'dinations card stock and ran it through the Textured Impressions folder. I then sanded the pieces and attached them to the 3" x 3" card stock base.
I stamped the images from the Scentsational Season stamp set on Very Vanilla card stock and cut them out using the Big Shot and Framelits Dies. What could be easier and faster?
I added a sentiment from Teeny Tiny Wishes to balance the look of the tags. I chose to use Stampin' Up! Linen Thread to go along with the more rustic look of the tags.

I keep repeating myself and here we go again, time is passing too fast. It's September 20th today and Christmas will be here in a little over 3 months! It's never too early to start on your Christmas cards and tags. 
To see more information on the Stampin' Up products I used for these tags just click here

Thanks for stopping by
Happy Stampin'
Jane


Friday, September 14, 2012

Tags, Tags and More Tags Plus StampinUpLNStamper Challenge 190

Scroll down for Challenge 190 One Layer Wow Card

This afternoon I have some Christmas tags I want to share with
 you. I found Winter Wishes Stitched Felt embellishments on the Clearance Rack  Here


These exclusive designs and custom coloring make these fun and cozy felt accents perfect adornment for your holiday greeting cards or Christmas tags. Unique designs make it easy to meet any holiday need. Each package has 16 pieces. 4 each of 4 designs for $3.99 each plus tax and shipping.
Products Used
 Cherry Cobbler, p.154 Wild Wasabi  p. 155 and Whisper White card stock p.156...($6.95 for 24 sheets)

Cherry Cobbler,p.154 Wild Wasabi, p.155 and Marina Mist 
p. 154 Stampin' Ink pads ($5.95 each) 

Adhesive: SNAIL ($6.95) Glue Dots p. 176 ($4.95)

Ribbon: Linen Thread p. 173 ($4.50)

Rhinestone Jewels p. 175 ($4.95)
Petite Pairs Stamp Set p. 134 ($20.95) Clear Mount; ($28.95)
  Wood Mount
Joyous Celebrations Stamp Set p. 7 ($15.95) Clear Mount; ($22.95 Wood Mount)


I have entered StampinUpLNStamper Challenger 190, One Layer with a Wow Card
The challenge was to make a card using only one layer. This was harder than I thought. I'm so used to using 2-3 layers, I had to think a while. I came up with this card using the beautiful new stamp set from the Holiday Edition catalog 
Snowflake Soiree p. 5 ($21.95) Clear Mount; ($29.95) Wood Mount
I used Whisper White Craft Stampin' Ink p. 157 ($7.50) and Night of Navy Card Stock p. 155 ($6.95) for 24 sheets

For any Stampin' Up! products just click here 
click on Shop Now.
Hope you have a great week end!
Happy Stampin!
Jane

Thursday, September 13, 2012

More Top Note Halloween Favors

Today I have some more Halloween Top Note Favors to show you. I'm working on another design of Halloween treat bags now. Check back in with me to see what I've come up with.

 Meet Frank..he's creeping over to your house for Halloween
Spooky ghost and bat...Ghost made with Owl builder Punch
 I'm batty for you 

Frank and Company
As you can see, the Top Note Favor bag has endless possibilities in embellishing for any theme you need.
Hope  you have a great Day!
Happy Stampin'
Jane
 

Monday, September 10, 2012

More Halloween

Tonight I have another Halloween project using the Big Shot, 
  the Mini Milk Carton Bigz L Die and the Typeset Alphabet Bigz Die. As so many other creations come together accidentally, this project did too.


These little containers with handles don't look like the Mini Milk Carton do they? What happened is I was folding and trimming the carton and I accidentally cut off the top where the carton comes together. I had cut out three of the milk cartons and I didn't want to waste the paper so I cut off the rest of the top portion and improvise by  turning them into little boxes with handles. For the handles I cut some of the left over designer series paper and attached the handles a couple of brads. The boxes are about 4 inches tall so some longer or bigger treats can fit nicely. I added the "BOO" because I couldn't help myself. I'm really into "BOO" right now.

Products Used
Howlstooth & Scaringbone Designer Series Paper p. 24 Holiday Catalog
Basic Black card stock p.156
 Champagne Glimmer Paper p. 18  Holiday Catalog
3/16" Black  Brads from the Neutrals Brads p.174
Big Shot Die Cutting Machine p. 186
Mini Milk Carton Big L Die p.194
Typeset Alphabet Bigz Die p. 192
Decorative Label Punch p. 182

Well I'm off to make some more projects for you to see. I hope you will give one of these a try.
Happy Stampin'
Jane


Sunday, September 9, 2012

Tutorial for Top Note Party Favors

Happy Sunday! It's seems like Fall here in Kalamazoo, Michigan. It's just right temperature wise and I'm loving being outside today.  I did have a couple of request to make a tutorial on how to make the Top Note Party Favors.

To start out you need the following:
 
2 Pieces of card stock 4" x 6"
1 piece of Designer Series Paper 4' x 6"
#2 White Paper Bag
Adhesive..I used SNAIL
Paper Snips or scissors 
Big Shot Die Machine
Top Note Bigz Die

 After running the paper through the Big Shot using the Top Note Die cut the edge off the designer series paper. This way when you adhere the designer paper to the card stock you will have a nice little border.

Cut the paper sack so you  have about 3" left.
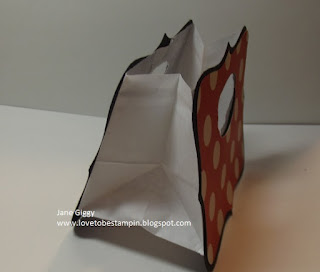
Unfold the sack like I have here before you punch out the handle with the Oval Punch.

Apply adhesive all the way around the outside of the paper sack, using the side that has a** seam. Add adhesive to the designer series paper and press it on the opposite side of the Top Note that has the sack. **I have you use this side with the seam so it won't get caught on the punch when punching out the handle.**

Place the paper sack on the Top Note that hasn't been punched  and press down. Be sure the sack is not hanging over the sides or the bottom. Using the Large Oval Punch (I used the small Oval Punch) and punch through the paper sack and Top Note.

 Once  you have the handle punched, place the punched Top Note on the one that isn't punched and draw the opening with a pencil. Apply adhesive to the other side of the white sack and like up the punched Top Note with the one that needs to be punched. Press together,  and punch once again.

 Your finished! This is a side view. The opening to the favor is about 3" X 4". It will hold a nice treat. Be sure to use Sticky Strip if you are going to add votives or something heavier than candy, ribbon, buttons, etc.

 Front view. Embellish as desired. 

Basic Black card stock p. 156
Designer Series Paper from Howlstooth & Scaringbone paper in the Holiday Catalog p. 24
SNAIL Adhesive p.177
Paper Snips p.180
Big Shot Die Machine p.186
Top Note Bigz Die p.193
Non Stampin' Up! White Paper Sack
 
 
The next two examples are Top Note Favors I made this year


The following are Top Note Favors from last year


These are so much fun to make. Almost everyone who sees them asks how I made them. I have taken orders for bridal and baby showers, for children's birthday parties and many other parties.
If the favors aren't fussy, I charge $7.95 for six. If I add silk flowers, ribbon and lace, the price is higher. So far, no one has complained about the cost. It's because the favors are unique and people can't buy them in the store.
I hope you will give them a try. Let me know what you are doing with the Top Note favor.

If you would like to shop for  Stampin' Up products, click here 

I hope you had a wonderful week-end
Happy Stampin'
Jane
 

Saturday, September 8, 2012

LNS Demo Only Challenge 189 Fall into Stamping

This weeks challenge was so much fun. So much fun that I made a card and the Fancy Favor Box.

I fell in love with the new designer paper, Orchard Harvest. I used the plaid side as the second layer of my card and on the opposite side I cut out the leaves and acorns and adhered them using SNAIL adhesive to Very Vanilla card stock.
I stamped a sentiment using Marina Mist Classic Stampin'Ink and the stamp set Trust God on a 1 3/4" Scallop Circle out of Very vanilla card stock and "just for you" from Teeny Tiny Wishes stamp set and Bitty Banners Framelits. I added Rhinestones from Rhinestone Jewels and 1/8"Marina Mist Taffeta Ribbon.

I cut the Fancy Favor Box using Crumb Cake card stock and the Big Shot Die Cutting Machine. I chose Early Espresso Core'dination Card stock and embossed the paper with Textured Impressions Embossing Folder. Using the new Stampin'Sanding System I sanded the card stock.

I used Word Window punch for the fence, the 1" circle, Small Oval punch, Cup Cake Builder, and Boho Blossoms punchs for the pumpkins with Tangerine Tango and Gumball Green card stock.
After punching out card stock using the Word Window punch, I used Crumb Cake Stampin' ink and a Sponge Dauber to make the fence look weathered. I cut Gumball Green card stock for the grass and the
trendels for the pumpkins. I used SNAIL adhesive and Stampin' Dimensionals to adhere the punched shapes to the card.
Don't forget to visit my Stampin'Up! Online store. www.janegiggy.stampinup.net

Happy Stampin'
Jane


Friday, September 7, 2012

Is It Halloween Yet?

I guess I'm getting a little ahead of the Halloween Holiday but I'm so excited to show you some Halloween projects I've made. The first is an old standby called Top Note Party Favor.
I make these in different papers and for all occasions. I used the Top Note Bigz Die p 193 and the Big Shot Die Cutting Machine p 186.
Meet Pumpkin and Friends
 Aren't they cute? They will hold candy, tea lights or Votive, ribbon, buttons, etc. What fun to find one at your place for a Halloween Party!
Spooky Bingo Bits p. 29 and Teeny Tiny Wishes p.133  big catalog
Basic Black and Whisper White card stock p.156
Tangerine card stock p.153
Howlstooth & Scaringbone designer series paper from the Holiday Mini p. 24
Basic Black and Tangerine Tango Classic Stampin' Pad ink
SNAIL adhesive p. 177 
1" and 1 1/4" Circle Punches p 184
Non Stampin' Up! Product: No. 2 white paper sack

 "BOO" Party Favors
Basic Black, Whisper White card stock p 156
Tangerine Tango designer series paper from the Brights Collection Stacks p 162
Tricky Treats stamp set p 28 and Spooky Bingo Bits p 29
SNAIL adhesive p 177
Classic Basic Black and Tangerine Tango Stampin' Ink Pad 
1" Square Punch p 183
Non Stampin' Up! No # White paper sack

The last project I have for today is my "BOO" hanging.
 I used a stretch canvas and covered it with a sheet of designer series paper from the Howlstooth & Scaringbone paper in the Holiday Catalog p. 24
Tangerine Tango card stock p 153
Champagne Glimmer Paper p 18 in the Holiday Catalog
Stampin' Dimensionals, Multipurpose Liquid Glue and SNAIL adhesive p 177
1/8" Basic Black Taffeta Ribbon p 172
Decorative Label Punch p 182
Typeset Alphabet Bigz Die p 192
Non Stamin' Up!  3"x 6" Stretch Canvas frame, glue gun

Check out the new Holiday Catalog on my Stampin' Up! online store. Just click here 
You can shop in your pj's and any time of the day or night without leaving your home. Your products will be shipped directly to you!
Happy Stampin'
Jane