Friday, October 5, 2012

Halloween Tic Tac Toe Game

Today I have a fun project...Tic Tac Toe.
I had so much fun playing this game as a child, with my children and grandchildren that I thought I would revise it and make it portable and easy to take on a trip or to play at home.


I had some orange felt so I blocked off nine spaces with a Sharpie marker. You can use card stock if you'd like.
I stamped images using VersaMark and then sprinkled Tempting Turquoise and Wild Wasabi embossing powder and heated with my heat tool. I stamped images from Tricky Treats and Googly Ghouls stamp sets on Whisper White card stock and when images were cool, I punched them out with the 1" circle punch; applied Multipurpose Liquid Glue to the back of the punch image and placed it inside the bottle cap.

Since I wanted the game to be mobile I used Multipurpose Liquid Glue and wrote the words, Tic Tac Toe and sprinkled Champagne Glass Glitter and let dry. To store, just fold up the orange felt and place everything in the bag.

What you meed to make this project
Champagne Glass Glitter pg. 158 #120997 $3.95
Multipurpose Liquid Glue pg. 177 # 110755 $3.95
Whisper White card stock pg.156 #100730 $6.95
Tempting Turquoise Emboss Powder pg. 159 #122950 $4.75
Wild Wasabi Emboss Powder pg. 159 #123224 $4.75
Tricky Treats stamp set pg. 28 #126327( clear)  $14.95
Googly Ghouls stamp set pg. 27 # 128063 (clear) $12.95
1" Circle Punch pg.184 #119868 $ 12.95
Heat Tool pg.159 #129033 $29.95

Non Stampin' Up! Products
Bottle Caps
Felt
Draw String Bag

To purchase any of the Stampin' Up! Products just click here

Happy Stampin!
Jane

Thursday, October 4, 2012

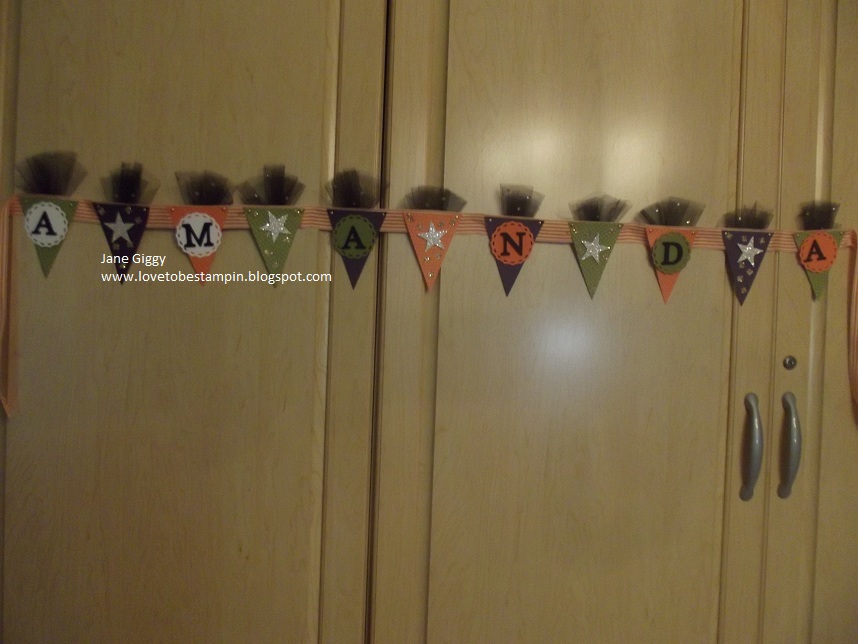
Perfect Pennants Halloween Banner

Today I have pretty Halloween banner that doubles as a birthday banner for our niece, Amanda who turns 23 on October 27th. This year we are having a Halloween Birthday Party for her. 


To start, I measured out the length of ribbon I would need and then ran the card stock and designer series papers through the Big Shot using the Perfect Pennants BigzL Die. This makes the whole process go very quickly. I would hate to have to cut out all the pennants by hand. I used Designer Series Brights Stacks in Old Olive and Pumpkin Pie. I used Pumpkin Pie, Old Olive, Whisper White, Elegant Eggplant card stock.

More Stampin' Up! products I used

Silver and Champagne Glimmer paper

Perfect Pennant BigzL Die
Big Shot Machine
Typeset Alphabet Bizg Die
Ittly Bitty Shape Punch Pack
Mulitpurpose Liquid Glue
1 3/4" Stripped Pumpkin Pie Ribbon;retired 
Gold Brads; retired
Large Star Punch; retired
1 3/4" Scallop Circle Punch

Non Stampin' Up! products
Glue Gun
Black Tulle Circles

For any of the Stampin' Up! products click here 
More Halloween projects tomorrow.
Happy Stampin'
Jane


Tuesday, October 2, 2012

Toxic Treats Luminaries

More Halloween Projects
This afternoon I have two Toxic Treats Luminaries to share with you.  I used the Toxic Treats and the Googly Ghouls stamp sets from the Holiday Catalog, Window Sheets, VersaMark stamp pad, Stampin' Up! Black Glitter now retired, black ribbon, battery operated tea lights, some mica flakes and my heat tool.


I save glass jars and today it came in handy. The smaller one on the right is a candle holder I found at the dollar store.
 They look much better when lit and especially at night time.
I cut a piece of window sheet that would fit on the inside of each glass container. I stamped with VeraMark, sprinkled with black embossing powder and heat set it with my heat tool. When cooled I set the window sheet  inside the glass jar with the embossed image facing the outside. I added some mica flakes because I felt like the candle needed something to set on.

What you need to make these Toxic Treats Luminaries

Googly Ghouls stamp set Clear pg. 17 #128063 $12.95
Toxic Treats stamp set pg. 25 #127901 $20.95
Window Sheets pg.160 #114323 $4.95 for 2 sheets 12' x 12"
VersaMark pg. 159 # 102283 $7.50
3/8" Black Taffeta Ribbon pg. 173 # 119962 $6.95
New Heat Tool pg. 159 #129053 $ 29.95

Non Stampin' Up!
Glass jars
Battery Operated tea lights 

To purchase any of the above Stampin' Up! products click here

Keep checking back for more Halloween projects this week!
Happy Stampin'
Jane
 

Monday, October 1, 2012

Pizza Circle Pumpkins

Today I have another Halloween 3-D project; Pizza cardboard circle pumpkins.
I used three 12 inch cardboard pizza circles. I cut them out free hand in different shapes and sizes and covered them with Wicked Fun Specialty designer paper from the Clearance Rack that you can find here


I cut a stem out of the left over cardboard and attached it to the back of the pumpkin using my glue gun. I used the Autumn Accents Bigz Die and ran it through the Big Shot Die Cutting machine and used my glue gun to adhere the leaves to the pumpkin.
I cut 12" by 1/8" strips from left over designer series paper and curled it around a paint brush handle before attaching them to the pumpkin.

What you need to make these pumpkins

Wicked Fun Specialty Paper from the clearance Rack
Multipurpose Liquid Glue pg.177 # 110755 $3.95
 Autumn Accents Bigz Die pg. 33 #127812 $21.95

Non Stampin' Up!
3 pizza circles

This would be a good project to make with your children or grandchildren. They store flat so you can have these pumpkins year after year.
Happy Stampin'!
Jane


Sunday, September 30, 2012

Halloween Picture Frame


Today I have a simple but easy Halloween project for you.
 A Halloween picture frame using retired designer series paper "Pick Your Poison" from the Clearance Rack you can get here


 I used a frame from one of the craft stores and covered it with a sheet of Pick Your Poison designer series paper using Multipurpose Liquid glue. Using the same package of designer series paper, I cut out the bat and added blood dripping from his mouth using Real Red Stampin' Right Marker. Before putting the bat picture in the frame I cut a piece of Window Sheet from the big catalog to cover the bat picture. You can't see it here but it looks just like a frame you would buy with glass.

I sanded the edges of the designer series paper using a Designer Sanding Block. This helps make the paper look old and worn.
That's it. A very fast project and gives a lot of bang for your buck!

What you will need to make this picture frame

Pick your Poison Designer Series Paper # 124001 $4.39
Sanding Blocks pg. 179 # 124304 $3.50 (2) blocks
Window Sheets pg. 160 #114323 $4.95 (2) 12 x 12" sheets
Real Red Stampin' Write Marker pg. 153 #100052 $3.50
Multipurpose Liquid Glue pg. 177 #110755 $3.95 
 
Non Stampin' Up!
Picture frame from $1 store or craft store

Tomorrow is the first day of October so Halloween will be here before we know it. I will be featuring more Halloween projects this week.
Hope your week end was a good one.
Happy Stampin'
Jane

Thursday, September 27, 2012

Watercolor Winter

I'm back today with another Christmas Card made from the stamp set Watercolor Winter. This set is what we call two-step stampin' because there is a bold image and an outlined image to the stamps. You can see better if you see the card.

  The poinsettia flower, holly and holly leaves are two-step stampin' stamps. I stamped the bold image first. I inked up my stamp and then stamped off on a piece of scrap paper then stamped. Next, I inked up the outline stamp and stamped over the first image. This is a great look and I use it when 
 ever I can. Now if you don't want the two-step look you can just use one stamp, that looks good too.

Products You will need to make this card

Whisper White card stock pg. 156 # 124302
Gumball Green card stock pg.152 # 126838
3/8" Riding Hood Red Taffeta Ribbon pg. 173 #122988
Gumball Green Stampin' Pad pg. 152 # 126861
Real Red Stampin' Pad pg.153 # 126945
Soft Suede Stampin' Pad pg. 156 # 126978
Big Shot Die Cutting Machine pg. 186 # 113439
Labels Collection Framelits pg. 191 # 125598
SNAIL Adhesive pg. 177 # 104332
Stampin' Dimensionals pg. 177 # 104430
Textured Impressions Embossing Folder Lacy Brocade
Holiday Catalog pg. 6 #127819


Tomorrow I'm back to posting Halloween ideas. See you then.
Happy Stampin'!
Jane

Tuesday, September 25, 2012

Ornament Keepsakes Christmas Cards

I'm so excited about the cards I'm showing you today. Not only did I used the Ornament Keepsakes stamp set, I cut the images out using the Big Shot and the Holiday Ornaments Framelites Dies. I bought them together as the Ornament Keepsake Bundle from the Holiday Catalog and saved 15%. You can have them for the same price. This bundle makes card making easy peasy!


I love the look of these cards!  For a change, I wanted a soft look and not the traditional Christmas colors.
These are just three of the 9 stamps that come in the Ornament Keepsakes stamp set.
The beautiful embossed oval was made using our new Textured Impressions Embossing Folder Holiday Frame. I think it's stunning don't you? If you have a lot of Christmas cards to make this year, the Ornament Keepsakes Bundle will make short work of your cards. The look is so elegant, making them is so easy and fun! There are many other combinations you could use. For some of your cards don't use the folder and stamp and cut out the ornaments and adhere them on your card. Again, easy peasy! I have other cards that will show you many other ideas using this bundle.

Products you will need to make these cards...Click here

Whisper White and Pretty In Pink card stock pg.156 # 100730 & pg. 154 #100459
Textured Impressions Embossing Folder Holiday Frame pg. 7 #127820
Ornament Keepsakes Bundle pg. 3 # 129950 (clear mount) 
# 129949 (wood mount)
Rhinestones  Basic Jewels pg. 175 # 119246
Stampin' Dimensionals pg. 177 # 104430
SNAIL Adhesive pg. 177 #104332
Big Shot Machine pg. 186 #113439
 
Non Stampin' Up Product
I used a Sharpie Marker to color the rhinestones pink before adhering them to my card.

In the weeks to come I have all kinds of projects to share with you. Fall, Halloween, Thanksgiving and Christmas. 

Again this year I'm having the 12 days of Christmas with a new project or card each week. I will keep you updated on when this will begin.  It will be earlier enough for you to use my ideas for your holiday planning.

Right now I'm working on a Halloween Birthday Party for October 27th. I will be sharing with you my projects.
I'm working on tree decoration using the Ornament Keepsakes Bundle and the beautiful Scalloped Tulle. I hope you will come back and see what I'm up to.
Happy Stampin'
Jane